标签 笔记 下的文章

TEB和PEB

以下讨论的是32位系统win

TEB

线程环境块
每一个线程都有一个TEB
在应用层而不是系统层中

线性地址

一个进程又很多线程,每一个线程又都有一个TEB,这些TEB都在进程的0x7FFDE000的线性内存处开始,每4KB为一个TEB

查看TEB结构

不同的windows版本种TEB结构会不同
TEB结构的开头是个NT_TIB结构,这个结构的0x018是个指向NT_TIB自己的指针

通过段寄存器访问TEB

FS段寄存器指向当前线程的TEB,所以fs:[18h]就是TEB的指针

mov eax,dword ptr fs:[18h]

eax就是TEB的指针

PEB

进程环境块
每个进程有一个PEB
在应用层而不是系统层中

通过段寄存器访问PEB

由于TEB中的0x30偏移处是指向PEB的指针,可以直接通过fs:[30h]获得PEB的指针

mov eax,dword ptr fs:[30h]

eax就是PEB的指针

通过BeingDebugged进行反调试

PEB结构中有一个BeingDebugged字段,当进程被调试时会变成1,否则为0,这个字段可用于反调试
更多反调试方法专门再写一篇进行总结
Windows内核笔记 - R3和R0通信

大量的知识真的劝退,这边把重点重新写出来,后期在看什么重要来高亮吧

DLL的封装

  • kernel32.dll和user32.dll这种的底层函数就被包含在ntdll.dll中
  • ntdll.dll中的函数成对出现,分别以“Nt”和“Zw”开头,这种函数叫做Native API

前排提醒

ntdll.dll中的Nt和Zw与ntoskrnl.exe中的Nt和Zw不一样

  • ntdll.dll中的Nt*函数为ntdll!Nt
  • ntoskrnl.exe中的Nt*函数为nt!Nt
  • Zw*同理

系统调用

  • 通过中断指令'int 0x2e'
    _KiIntSystemCall@0:
    lea edx, [esp+8]
    int 0x2e
    ret
  • 通过指令'sysenter'
    _KiFastSystemCall@0:
    mov edx,csp
    sysenter
    _KiFastSystemCallRet@0:
    ret
  • 不管是中断式系统调用(通过中断指令'int 0x2e')还是快速系统调用(通过指令'sysenter'),在调用函数时都是通过将函数所对应的服务号(SSDT数组中的索引值)放入EAX中来传递的(详见后面的SSDT)
  • 'int 0x2e'用于xp以下版本
  • 'sysenter'用于xp及以上版本
  • 通过系统调用,能让R3层进入R0层
  • 'KUSER_SHARED_SYSCALL'指向KiIntSystemCall()或KiFastSystemCall()两个函数其中之一,实际开发中,直接
    mov ecx, KUSER_SHARED_SYSCALL
    CALL [ecx]

SSDT

  • SSDT是系统服务描述符表,这个表在内核ntoskrnl.exe中
  • 这个表的作用是将函数对应的服务号和nt!Nt*的API一一对应
  • SSDT查表操作在系统调用中发生,由于_KiFastSystemCall/_KiFastSystemCall是内核的总入口(就它们俩中的一个),在调用nt!Nt函数时需要将函数所对应的服务号放入EAX中来传递然后_KiFastSystemCall/_KiFastSystemCall中的'int 0x2e'/'sysenter'里面就会进行一个查表操作,把EAX传递过去的服务号当作索引来找到nt!Nt函数,然后调用这个nt!Nt*函数

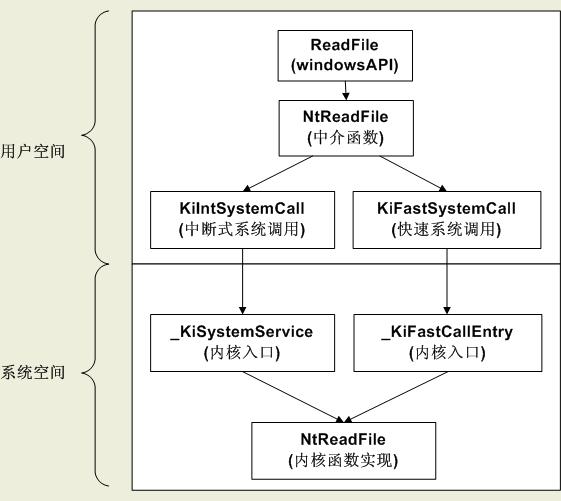
从用户模式调用Native API

585678_67hi0eqg6aho6la (1).jpg

  • 通过ntdll!NT和ntdll!Zw调用是没区别的,参数都会经过严格审核
  • 图中的中介函数是ntdll!Nt,内核函数实现是nt!Nt

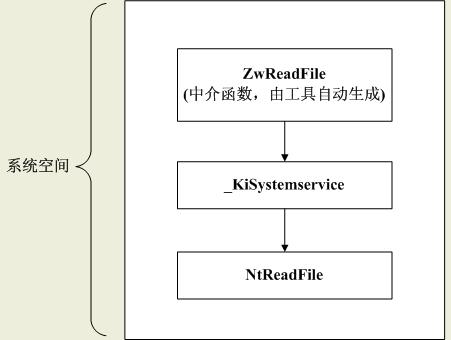
从内核模式调用Native API

585678_fltl4j7rhfeddup.jpg

  • 如果是快速调用的话,_KiSystemService换成_KiFastCallEntry
  • 图中的Zw是nt!Zw,Nt是nt!Nt

Previous Mode(先前模式)

  • 从用户态调用Native API则Previous Mode为用户态,Native API对传入的参数进行严格的审查
  • 从内核态调用Native API则Previous Mode为内核态,Native API不会对传入的参数进行严格的审查

Nt和Zw的区别

  • 调用nt!Nt*的API会直接调用对应的代码,Previous Mode很可能为用户态
  • 调用nt!Zw的API会通过KiSystemService/KiFastCallEntry最终跳转到对应函数代码处(nt!Nt处),Previous Mode会被设为内核态

直接调用nt!Nt*会位于用户态的原因

  • 由于内核组件可能在各任意线程的上下文中

The NtXxxx version of the native system service is the name of the function itself. Thus, when a Kernel Mode component calls the NtXxxx version of the system service, whatever is presently set into previous mode is unchanged. Thus, it is quite possible that the Kernel component could be running on an arbitrary User stack, with the requestor mode set to User. The system service will not know any better, attempt to validate the request parameters, possibly using the credentials of the arbitrary User Mode thread, and thus possibly fail the request. Another problem here is that one step in the validation process for a User Mode request is that all passed in buffers have either ProbeForRead or ProbeForWrite executed on them, depending on the buffer’s usage. These routines raise exceptions if executed on Kernel Mode addresses. Therefore, if you pass in Kernel Mode buffers with your request mode set to User, your calls into the native API return STATUS_ACCESS_VIOLATION.

  • 开发内核模式驱动的时候,可以通过nt!Zw*来避免额外的参数检查
  • 如果想要避免杀毒软件在SSDT中上Hook可以直接调用nt!Nt。要自己调用nt!Nt的话必须先将Previous Mode设为内核模式(KernelMode)。(详见:https://bbs.pediy.com/thread-55142.htm

参考

  1. 段钢-加密与解密
  2. https://bbs.pediy.com/thread-177772.htm
  3. http://www.osronline.com/article.cfm%5earticle=257.htm